 |
|
| Protanium® Steel: Quality assurance |
|
All tools are inspected by the machine operator and the operator at the next step in production. Bondhus is serious about all tools being within specification – no compromises, no seconds, no exceptions. Sixteen of these tests will be outlined below. |
|
|
To do this test, an indenter is forced into the surface of the steel with a pressure referred to as the minor load. Next, a stronger force, known as the major load, is applied and then released. The difference between the indentation made by the minor and major loads is measured and used to establish the Rockwell hardness. This is an over-simplified explanation, but is enough to understand the principle of the test.
|
|
|
The Rockwell hardness test is used so frequently and so commonly that standardized charts exist for converting between Rockwell and Brinell values and quickly checking tensile strength based upon a given hardness value. Many shops actually even post these charts on a wall for easy access. The hardness value of Protanium® Steel is considerably higher than most of Bondhus’s competitors. The competitors that have hardness values approaching those of Bondhus, sacrifice ductility as a tradeoff. The characteristic that makes Protanium® Steel truly unique is that it achieves a high degree of hardness, without compromising ductility. |
|
|
The Bondhus standard assures in excess of 99% of all breaks will actually break clean and straight. Even the best competitors cannot hit 90%, and many are below 50%. Bondhus understands that a tool that shatters is a safety hazard to both the operator and equipment in the vicinity. Torsional tensile strength At a given point, steel that is twisted far enough will tear. The torsional tensile strength for every batch of steel is tested and recorded, and an ongoing effort is made to improve strength and reduce or eliminate shattering. The heat treating process is adjusted for every batch of steel to obtain maximum hardness while retaining maximum ductility. Bondhus tests every batch as follows: |
|
|
The Jominy test quenches a bar of steel in a spray of water. The bar is then ground flat, to a precise depth, along its length to remove decarburized material. Then hardness is measured along its length in regular intervals using a Rockwell hardness tester. The data is gathered from the test in pairs of values consisting of a Rockwell hardness value and its associated distance from the quenched end of the bar. These values are then used to calculate the ideal quench cycle and medium to be used in attaining the required hardness for Protanium® Steel. |
|
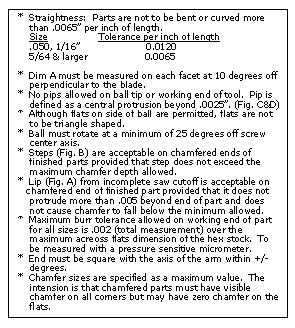
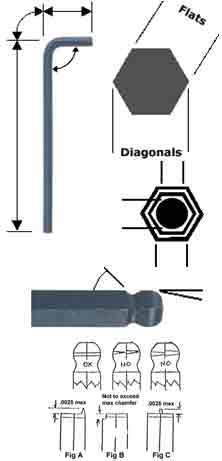
The following is an example of a partial specification
for a ball end L-wrench. |
|
|
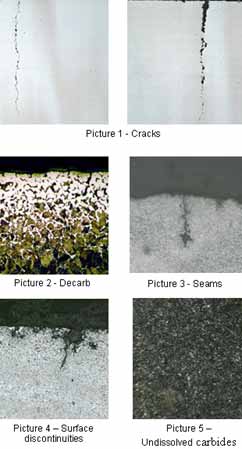
Edge sharpness Sharp edges are critical to the tool fitting properly in the fastener. Rounded corners cause slippage and premature failure of both the tool and the fastener. Bondhus tools have the sharpest edges in the business. See Picture 2. Grain size The strength and hardness of steel is partially determined by this measure. Monitoring grain size before and after heat treating assures the smallest grain size possible, which is an important aspect of Protanium® Steel. Brittle fracturing Poor heat treating, heat treating that is incompatible with the steel, or impurities in the steel can cause fracturing. Aside from breaking a tool at less than optimum torque, the real possibility of shattering causes a serious safety hazard. See Picture 3. Bondhus controls the heat treating process by customizing it to each individual tool size and the unique characteristics of every batch of steel. |
|
|
Decarb The loss of carbon from the surface that results when the surface oxidizes to form CO and CO2 which escapes to the atmosphere. See Picture 2. Seams The line formed when steel is pulled through a die, separated, and then rejoined at the exit point of the die is referred to as a seam. See Picture 3. Seams can cause brittle fracturing. Surface discontinuities See Picture 4. This type of defect contributes to brittle fracturing. Undissolved carbides See Picture 5. This type of defect contributes to brittle fracturing. Inclusions Oxide inclusions in steel are present both naturally and as a result of the reaction between the liquid steel and alloying elements that are added. It is important to eliminate these inclusions, so the addition of manganese and silicon is often used as a remedy. Bondhus closely controls every aspect of the production of Protanium® Steel. While defects like those above plague other manufacturers, close monitoring prevents them from compromising the quality Bondhus tools. |
|
|
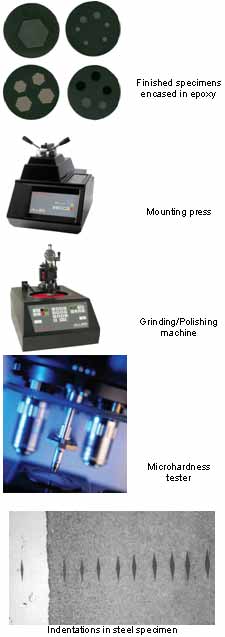
Slugs of steel are cut to length, and encased in epoxy with the aid of a mounting press. Once the melted epoxy has cooled and hardened, the samples are ground and polished with progressively finer grits until they have a mirror like finish, and finally they are etched to bring out the grain and structure in the steel. Once steel specimens have been mounted, they are ready to be tested for hardness. Microhardness testing is a means of accurately measuring hardness on a microscopic level. A highly precise diamond indenter, with a load of 15 to 1000 gf, is used to make a tiny diamond shaped pyramid impression in the steel. The impressions made in the specimens are next measured microscopically for length and depth. These values are used to calculate hardness values and can also be converted to tensile strength, Rockwell hardness, and other hardness scales. The values obtained from the microhardness testing are used to assure compliance with the Protanium® Steel specification or can also be used to diagnose problems. Bondhus controls the heat treating process by customizing it to each individual tool size and the unique characteristics of every batch of steel. |
|

 Conformance to the Bondhus specification means that
qualified technicians perform constant inspection,
testing, evaluation, and adjustments to insure that
the ‘no compromises’ policy is always adhered to.
Bondhus does over 60 separate tests to guarantee
that every tool manufactured is 100% within spec and
worthy of carrying the Bondhus name.
 Bondhus strives for a consistent hardness
throughout, not just on the surface. Cross
sections are prepared from every lot of steel
and periodically during heat treating and then
tested using a micro hardness tester at
intervals of one thousandth of an inch. Too much
hardness causes brittleness; not enough causes
premature wear. Hardness is tested on every lot
of steel, and done both prior and subsequent to
heat treating.


